Explanations, and how to use the knowledge to make new landscapes
Some simple mathematics
(don't worry and don't skip this section, it's really simple, just some info on how Subtract works, like 2-2=0 :-) )
As have been mentioned above, sign (as in 'negative or positive') of
Shape
simply defines where you have solid and where you don't.
In the texture, we made Shape to be equal to
[First Leaf,altitude] minus [Second Leaf,sorta height] (that's how blend by subtract works in MojoWorld).
Now some elementary school math: the result of subtraction is negative when first value is smaller than second. It is equal to zero if and only if both parameters is equal. That is, you get zero where Altitude is equal to [second texture leaf]
Quoting from above,"The surface itself is placed where Shape is equal to zero."
Therefore, isosurface is placed where altitude is equal to second texture leaf.
Second leaf behaves "almost" like MojoWorld's "Mountain Height"(A.K.A land texture). Below there's more info on this almost, and how to make this "almost" be "identical".
World Position and Surface Position
First, some drawing that explains what is World Position and what is Surface Position in the
MojoWorld:
(from now on, World Position and Surface Position is abbrevated as WorldPos and SurfacePos)
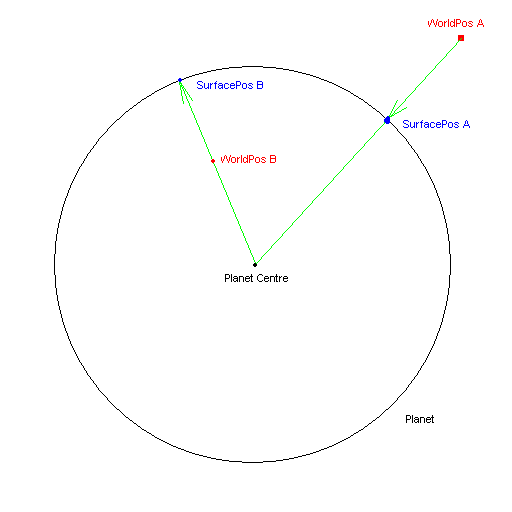
WorldPos(red) it's point where texture are evaluated. SurfacePos (blue) is computed from WorldPos as shown on image. Two example points A and B is shown to display that it works in same way for point below and above zero altitude.
If you feed WorldPos to fractal, fractal will be computed in the red point,
if you feed SurfacePos, fractal will be computed in blue point.
The main difference is that for all points along some green line you will get same SurfacePos.
(from now on, World Position and Surface Position is abbrevated as WorldPos and SurfacePos)
WorldPos(red) it's point where texture are evaluated. SurfacePos (blue) is computed from WorldPos as shown on image. Two example points A and B is shown to display that it works in same way for point below and above zero altitude.
If you feed WorldPos to fractal, fractal will be computed in the red point,
if you feed SurfacePos, fractal will be computed in blue point.
The main difference is that for all points along some green line you will get same SurfacePos.
MojoWorld Landscapes and Isosurface Landscapes
If you do the landscape as described above, the second texture leaf will define the terrain
"almost" same as normal MojoWorld's Mountain Height texture (that defines MojoWorld's
landscape)
The main difference is that (as explained in MojoWorld manual and elsewhere), in the MojoWorld's "Mountain Height", there's in fact no WorldPos:
In the MojoWorld's Mountain Height WorldPos is always equal to SurfacePos.
In the Isosurfaces, WorldPos is always the point "somewhere in the air" where Volumetrics renderer is checking the sign of Shape to find if it is empty or not.
If you replace World Position by Surface Position, you get terrain that will be identical to what you'd get if you'd have second leaf ALONE in the MojoWorld's Mountain Height. But it is not really recommended for simple terrains - this way you lose many of benefits of using Isosurface. For example, using WorldPos in Shape let you easily create overhangs (no need to mess with displacements) by simply increasing Result Scale of fractal. (tho if you increase it too much you may get some floating things *) In Function Graph, you can use best of both methods - linear blend of World Position and Surface Position (btw, driving blend value with fractals(esp. rough ones) is -not- recommended, it will not really do what you'd expect).
(* floating things is defined by shape just like terrain, so there's only two ways to get rid of floating things: make Shape that doesn't define any floaters, or paint floaters out in postwork. First method is preferred, you can achieve that by using smaller result scales or by using linear blend of World Position and Surface Position to get best result. Second method is kind of more artist-friendly. Also it is not easy to make terrain with holes but without floating bits)
The tutorial is quite brief so you need to read the explanations and make sure you understand them.
After completing this tutorial you should be able to do same thing with function graph. Create Subtract node, to the left side connect altitude, to the right side connect the fractal, connect output of subtract to "Input".
Things to try next:
Try replacing World Position with linear blend of World Position and Surface Position.
Try selecting some distortion in the first leaf (where you have altitude), you may get very interesting results.
Look at sample world files.